![](https://static.wixstatic.com/media/3b5104_759226de6bb441d28fe6781a59f360eb~mv2.jpg/v1/fill/w_147,h_251,al_c,q_80,usm_0.66_1.00_0.01,blur_2,enc_auto/3b5104_759226de6bb441d28fe6781a59f360eb~mv2.jpg)
Flags are so much fun to create !
Especially when you can use items you already have .
I pretty much had everything on hand for this project.
Here’s what I used .
Supplies needed:
• long piece of board
• 3 wooden stars ( you can cut them out of cardboard if you don’t have any on hand )
• napkin for the stars ( you can paint them instead)
• wire for hanger ( you can use twine if you don’t have any )
• Hot Glue
• masking tape ( or paint tape )
• White , Blue, Black and Red paint
• Clear Elmer’s glue or Mod Podge
• raffia and material for a bow
• Dixie Belle wax brown (or brown paint)
![](https://static.wixstatic.com/media/3b5104_0427e8486a2d4d06be572c7a175adda0~mv2.jpg/v1/fill/w_147,h_207,al_c,q_80,usm_0.66_1.00_0.01,blur_2,enc_auto/3b5104_0427e8486a2d4d06be572c7a175adda0~mv2.jpg)
I used a left over piece of wood I had in my work shop.
It was the perfect length.
I did drill two hole on top for the hanger.
I drew a line for the top part that I wanted to paint Blue.
Just judge how far you want it to be by the size of your board.
![](https://static.wixstatic.com/media/3b5104_d575ad4ed2094e2a97a2e4b57fd7564b~mv2.jpg/v1/fill/w_147,h_190,al_c,q_80,usm_0.66_1.00_0.01,blur_2,enc_auto/3b5104_d575ad4ed2094e2a97a2e4b57fd7564b~mv2.jpg)
This is the blue I used.
![](https://static.wixstatic.com/media/3b5104_3ebbd88fb5404c7ab6976de4e4900a43~mv2.jpg/v1/fill/w_147,h_173,al_c,q_80,usm_0.66_1.00_0.01,blur_2,enc_auto/3b5104_3ebbd88fb5404c7ab6976de4e4900a43~mv2.jpg)
I actually had enough for one coat !🤣
![](https://static.wixstatic.com/media/3b5104_d4dcd14a15dd4963bf07e94985f9fbf6~mv2.jpg/v1/fill/w_147,h_161,al_c,q_80,usm_0.66_1.00_0.01,blur_2,enc_auto/3b5104_d4dcd14a15dd4963bf07e94985f9fbf6~mv2.jpg)
I had these stars from a previous project so I thought they would be perfect.
![](https://static.wixstatic.com/media/3b5104_bfbf5a04f396497198f530580c51888d~mv2.jpg/v1/fill/w_147,h_208,al_c,q_80,usm_0.66_1.00_0.01,blur_2,enc_auto/3b5104_bfbf5a04f396497198f530580c51888d~mv2.jpg)
I also had this one napkin I actually got a couple of years ago from Barb with The Shabby Tree as a giveaway. 😀
The stars on it was perfect for covering my stars!
![](https://static.wixstatic.com/media/3b5104_3ff00e07a2c447e19e59a4619d7bff04~mv2.jpg/v1/fill/w_147,h_212,al_c,q_80,usm_0.66_1.00_0.01,blur_2,enc_auto/3b5104_3ff00e07a2c447e19e59a4619d7bff04~mv2.jpg)
I used Elmer’s glue to apply them on.
![](https://static.wixstatic.com/media/3b5104_74d902dc7d08454c9885461350affb0c~mv2.jpg/v1/fill/w_147,h_150,al_c,q_80,usm_0.66_1.00_0.01,blur_2,enc_auto/3b5104_74d902dc7d08454c9885461350affb0c~mv2.jpg)
I let them all dry before sanding off the edges .
![](https://static.wixstatic.com/media/3b5104_744d317b1be7475a8530dc49bd28a8bc~mv2.jpg/v1/fill/w_147,h_159,al_c,q_80,usm_0.66_1.00_0.01,blur_2,enc_auto/3b5104_744d317b1be7475a8530dc49bd28a8bc~mv2.jpg)
Here they are ! I love how they look.
![](https://static.wixstatic.com/media/3b5104_ea021cdb475a4ff0a9c377efc9fa882a~mv2.jpg/v1/fill/w_147,h_200,al_c,q_80,usm_0.66_1.00_0.01,blur_2,enc_auto/3b5104_ea021cdb475a4ff0a9c377efc9fa882a~mv2.jpg)
I took my masking tape and covered the bottom half of my board .
![](https://static.wixstatic.com/media/3b5104_57daaa5e907948499fddb19604e85d22~mv2.jpg/v1/fill/w_147,h_197,al_c,q_80,usm_0.66_1.00_0.01,blur_2,enc_auto/3b5104_57daaa5e907948499fddb19604e85d22~mv2.jpg)
Make sure your strips of tape are nice and straight also press down on them so they are on the board firmly.
![](https://static.wixstatic.com/media/3b5104_d1bd110c58b3427c91292f736c3a22a7~mv2.jpg/v1/fill/w_147,h_163,al_c,q_80,usm_0.66_1.00_0.01,blur_2,enc_auto/3b5104_d1bd110c58b3427c91292f736c3a22a7~mv2.jpg)
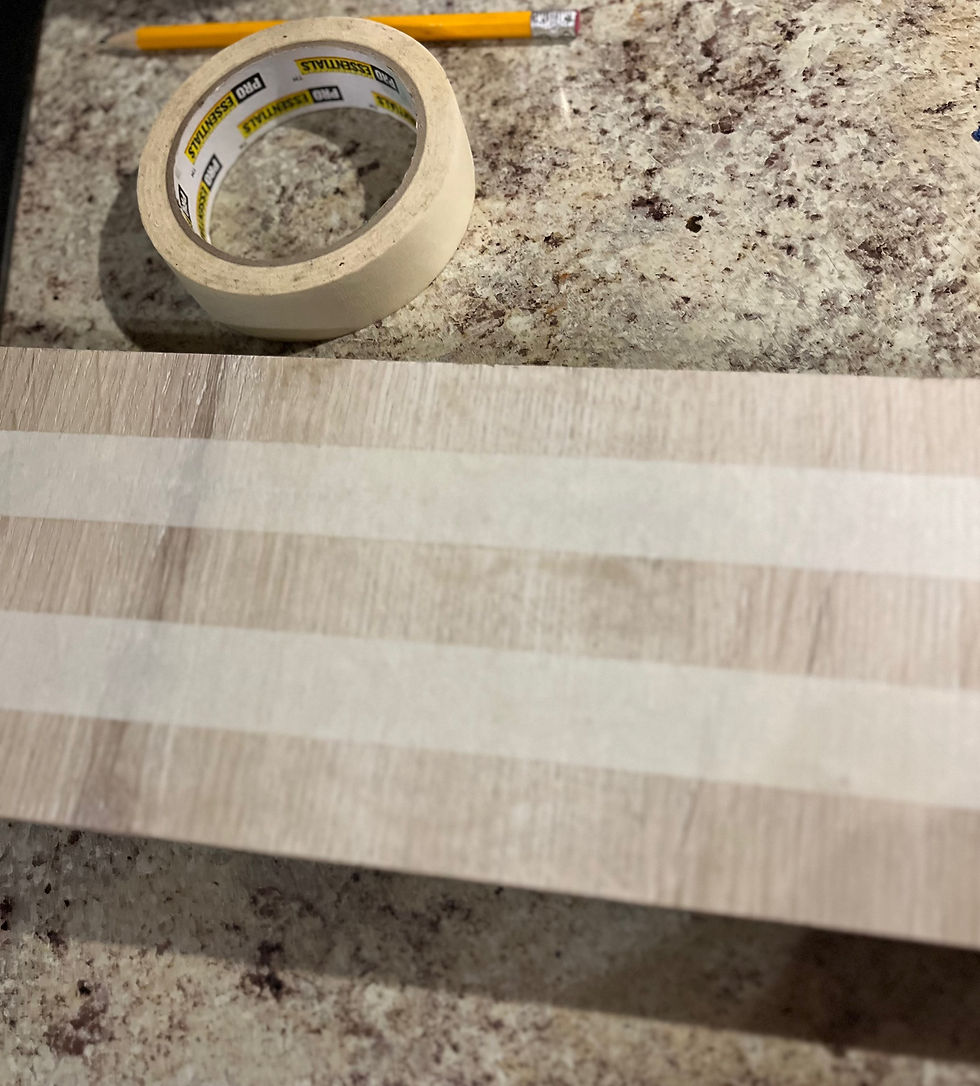
I then pulled off every other one .
![](https://static.wixstatic.com/media/3b5104_1319b62726c44a47b88a721f2a123800~mv2.jpg/v1/fill/w_147,h_184,al_c,q_80,usm_0.66_1.00_0.01,blur_2,enc_auto/3b5104_1319b62726c44a47b88a721f2a123800~mv2.jpg)
Then I got ready to paint my red stripes . This is the color red I used.
![](https://static.wixstatic.com/media/3b5104_87e6c9fe9e7948bc827b69731a191ad7~mv2.jpg/v1/fill/w_147,h_157,al_c,q_80,usm_0.66_1.00_0.01,blur_2,enc_auto/3b5104_87e6c9fe9e7948bc827b69731a191ad7~mv2.jpg)
I’m sure you noticed that I didn’t paint the other stripes white.
I really liked that creamy tan color the board already had so I wanted to leave those that color .
You can paint your board white ,then once it’s completely dry you can put your tape on it and then pull every other strip to paint red . I do recommend using paint tape if you do that to make sure your paint doesn’t come off when you remove the tape .
![](https://static.wixstatic.com/media/3b5104_8170833c2a6d4ae8a462cf129a3d4622~mv2.jpg/v1/fill/w_147,h_161,al_c,q_80,usm_0.66_1.00_0.01,blur_2,enc_auto/3b5104_8170833c2a6d4ae8a462cf129a3d4622~mv2.jpg)
I gave this red two coats .
![](https://static.wixstatic.com/media/3b5104_21adeccaa6354663a1e57084e3523a46~mv2.jpg/v1/fill/w_147,h_296,al_c,q_80,usm_0.66_1.00_0.01,blur_2,enc_auto/3b5104_21adeccaa6354663a1e57084e3523a46~mv2.jpg)
Then when dry I removed the tape.
![](https://static.wixstatic.com/media/3b5104_e9235711407549acbb4e50aed0475c93~mv2.jpg/v1/fill/w_147,h_175,al_c,q_80,usm_0.66_1.00_0.01,blur_2,enc_auto/3b5104_e9235711407549acbb4e50aed0475c93~mv2.jpg)
I then glued my stars on the top part of my board.
![](https://static.wixstatic.com/media/3b5104_afcdce1463e4410eac0b8a6f4274681b~mv2.jpg/v1/fill/w_147,h_180,al_c,q_80,usm_0.66_1.00_0.01,blur_2,enc_auto/3b5104_afcdce1463e4410eac0b8a6f4274681b~mv2.jpg)
I used my Dixie Belle wax in brown to grunge my board up a little. You don’t have to do this step if you don’t want to .
![](https://static.wixstatic.com/media/3b5104_6dfeb4c930824f9b87a3edec1cb2205a~mv2.jpg/v1/fill/w_147,h_171,al_c,q_80,usm_0.66_1.00_0.01,blur_2,enc_auto/3b5104_6dfeb4c930824f9b87a3edec1cb2205a~mv2.jpg)
I always love the look it gives it.
![](https://static.wixstatic.com/media/3b5104_ba89cb19458b41e38dd13a4ec4443fbe~mv2.jpg/v1/fill/w_147,h_174,al_c,q_80,usm_0.66_1.00_0.01,blur_2,enc_auto/3b5104_ba89cb19458b41e38dd13a4ec4443fbe~mv2.jpg)
I then added my wire hanger.
This is a 20 gage wire.
![](https://static.wixstatic.com/media/3b5104_bb982a7165bd4e719785fad06cc602c8~mv2.jpg/v1/fill/w_147,h_149,al_c,q_80,usm_0.66_1.00_0.01,blur_2,enc_auto/3b5104_bb982a7165bd4e719785fad06cc602c8~mv2.jpg)
I wrapped it threw the hole leaving a little piece sticking out.
![](https://static.wixstatic.com/media/3b5104_bc33174592f7499bba0f7500a9212c85~mv2.png/v1/fill/w_49,h_48,al_c,q_85,usm_0.66_1.00_0.01,blur_2,enc_auto/3b5104_bc33174592f7499bba0f7500a9212c85~mv2.png)
I always like taking that little piece of wire and then wrapping it around a paint brush to curl the ends!
![](https://static.wixstatic.com/media/3b5104_9c2064de336f40619eab54ec0f67c528~mv2.jpg/v1/fill/w_147,h_139,al_c,q_80,usm_0.66_1.00_0.01,blur_2,enc_auto/3b5104_9c2064de336f40619eab54ec0f67c528~mv2.jpg)
I just love those little touches!
![](https://static.wixstatic.com/media/3b5104_2dc76baf9ca2442f89f9dac1b0dcf86f~mv2.jpg/v1/fill/w_147,h_190,al_c,q_80,usm_0.66_1.00_0.01,blur_2,enc_auto/3b5104_2dc76baf9ca2442f89f9dac1b0dcf86f~mv2.jpg)
Look how adorable that looks!
![](https://static.wixstatic.com/media/3b5104_2b479f297985439492eb8c02739ac319~mv2.jpg/v1/fill/w_147,h_206,al_c,q_80,usm_0.66_1.00_0.01,blur_2,enc_auto/3b5104_2b479f297985439492eb8c02739ac319~mv2.jpg)
I then lightly sanded my board to give it that distressed look.
![](https://static.wixstatic.com/media/3b5104_b3570c2f7ea7442f8b015fa9d14dd615~mv2.jpg/v1/fill/w_147,h_166,al_c,q_80,usm_0.66_1.00_0.01,blur_2,enc_auto/3b5104_b3570c2f7ea7442f8b015fa9d14dd615~mv2.jpg)
I did the top area too.
![](https://static.wixstatic.com/media/3b5104_c3508df8c2a7455092cc52debffa9f59~mv2.jpg/v1/fill/w_147,h_177,al_c,q_80,usm_0.66_1.00_0.01,blur_2,enc_auto/3b5104_c3508df8c2a7455092cc52debffa9f59~mv2.jpg)
I then used white first then black to speckle my board using an old toothbrush for that step .
![](https://static.wixstatic.com/media/3b5104_58fda4721aae4ea19a74ce712364adca~mv2.jpg/v1/fill/w_147,h_182,al_c,q_80,usm_0.66_1.00_0.01,blur_2,enc_auto/3b5104_58fda4721aae4ea19a74ce712364adca~mv2.jpg)
Again to me those little steps add to it! Making it unique.
![](https://static.wixstatic.com/media/3b5104_f761e18fddc34dc8a696e62c3d37c4a6~mv2.jpg/v1/fill/w_147,h_190,al_c,q_80,usm_0.66_1.00_0.01,blur_2,enc_auto/3b5104_f761e18fddc34dc8a696e62c3d37c4a6~mv2.jpg)
I love that look too!
![](https://static.wixstatic.com/media/3b5104_1b3d101b73b24b03b4102ac8f3532a86~mv2.jpg/v1/fill/w_147,h_232,al_c,q_80,usm_0.66_1.00_0.01,blur_2,enc_auto/3b5104_1b3d101b73b24b03b4102ac8f3532a86~mv2.jpg)
Then I took a little material and some raffia to make a bow .
![](https://static.wixstatic.com/media/3b5104_b6263253db5e444281922a6debd2e4c8~mv2.jpg/v1/fill/w_147,h_204,al_c,q_80,usm_0.66_1.00_0.01,blur_2,enc_auto/3b5104_b6263253db5e444281922a6debd2e4c8~mv2.jpg)
I love having these coffee stained tags handy when I need them .
![](https://static.wixstatic.com/media/3b5104_c631083379cb44beb28b7cbc862bb000~mv2.jpg/v1/fill/w_147,h_237,al_c,q_80,usm_0.66_1.00_0.01,blur_2,enc_auto/3b5104_c631083379cb44beb28b7cbc862bb000~mv2.jpg)
I used one of my Tags that I had already coffee stained and painted this quick and simple Flag on it using my watercolors .
![](https://static.wixstatic.com/media/3b5104_2eb3d04b96554015a133717b23602ec2~mv2.jpg/v1/fill/w_147,h_262,al_c,q_80,usm_0.66_1.00_0.01,blur_2,enc_auto/3b5104_2eb3d04b96554015a133717b23602ec2~mv2.jpg)
The Happy 4th of July tag added the perfect touch.
![](https://static.wixstatic.com/media/3b5104_ffc3fa5f15a645539d39f3db18b00826~mv2.png/v1/fill/w_49,h_74,al_c,q_85,usm_0.66_1.00_0.01,blur_2,enc_auto/3b5104_ffc3fa5f15a645539d39f3db18b00826~mv2.png)
I simply love the way this Flag turned out!
I hope you give this fun project a try !
Please make sure you are following us on Facebook for daily inspiration and crafting ideas!
Happy creating!
4th of July Hang tags